Removing background and undercutting for inlaying
gold
When I
first started engraving, I would start by cutting the main outlines, and
then go back in and recut with the same V graver to make deeper
outlines adjacent to the areas that needed to have the background
removed Next, several sized flats were used to recess the surface
between the V recuts.
Later, I started using a dental rotary tool (made by Buffalo Dental) for
cutting away background and undercutting. The metal can be removed faster this way, but it takes practice to maintain control to prevent
the tool from getting away from you and taking out a border or leaf. With
experience, a person can become steady with the rotary tool, which speeds up the process considerably. With good control of the rotary tool, it isn't
necessary to do recutting with a V before beginning to remove
background, or the material for a gold inlay pocket. This saves time.
To steady
the hand using the rotary tool, hold the handpiece like a pencil. Place
the middle finger of the same hand against the tool toward the point to
brace it. Also, have this finger rest on the work to provide support. Use the thumb or index finger of the other hand to rest against
the handpiece near the point and against the work. This provides two
fingers to brace the tool (one in each direction) and, finally, the point
of the tool in the work makes the third leg of a tripod.
Make
friends with a local dentist
and ask him to save some of the carbide friction grip burrs for you.
Dentists go through them quickly, throwing them out long before they are
too dull for what engravers require.
Use the preshaped ones for the larger open areas in the
background, or for pocket cutting. For getting into corners and
undercutting, I grind them down to a point on a diamond lap. With the
burr in the rotary tool, hold it against a turning diamond lap and step on
the rotary foot pedal. This will quickly grind the burr to a point.
Depending on what is needed, grind it to a narrow or thicker point. Next,
hold one finger on the burr so it can not spin and grind a couple of flats
at random on the point. Try cutting with it and if it doesn't cut well,
place another random flat on the point. Keep doing this until you hit a
grind that cuts well. It may take three or four tries, but since the
flats are random, it only takes a few seconds to place another flat
on.
Most of the time, the shape that seems to cut best is similar to a
tiny flat-head screwdriver. Make them different sizes as needed,: a
wider one for cleaning out corners and squaring up edges, and so forth.,
and a narrower one to deepen a line for wire inlay and for undercutting.
Undercutting with the
rotary is quicker than using a graver for undercutting
small wire inlays, especially if there are a lot of spirals, twists and
turns.
For
undercutting straight borders, a graver may be quicker than a rotary tool.
If you want to make an undercut graver and
use this method, make narrow V graver. A good shape for this is a knife edge profile with a 45 degree face. Place a
small heel on the tip. I prefer a 17 degree heel. Put it the single
heel straight on, so that the resulting shape is basically a very small
flat tip graver. Make this type of pointed from high speed steel or
M-42 cobalt. Carbide or Carbalt is too brittle for a point this narrow and it would break.
For larger
sheet gold inlays, undercut the edges of the pocket, and raise teeth
in the center to grip the underside of the inlay and prevent the gold from
bowing up in the middle.
I don't
know if the Buffalo dental rotary tools are still made. The
one I have is probably 25 years old, and still works well. I had to make
a new spindle for it, but the bearings are still rolling smoothly.
I now have
an
NSK Presto rotary tool
($340, available from Brasseler
USA, phone
800-841-4522 ex. 4675)
and switch back and forth between the two. An unexpected thing
happened when I made the new push-in spindle for the Buffalo. I accidentally made the spindle hole slightly off center, but discovered this was a benefit with
the homemade sharpened burrs. Since the shank of the burr is slightly off center, I can remove a freshly ground burr, turn it 30 degrees, and push it back it
and the point will have a wobble. The wobble is a benefit because it throws one of the cutting edges out, and most of the time the homemade ground point will
cut better. If it doesn't, remove the burr, turn it another 20 or 30 degrees and try
again. When it does cut well, the foot pedal speed will affect how wide
the point will cut. At a slow speed it will cut a fine line, and at a
higher speed, the point will cut wider (because it is wobbling more), and
be more aggressive. With the NSK rotary, this won't work because they
turn truer than this off-center spindle in the Buffalo.
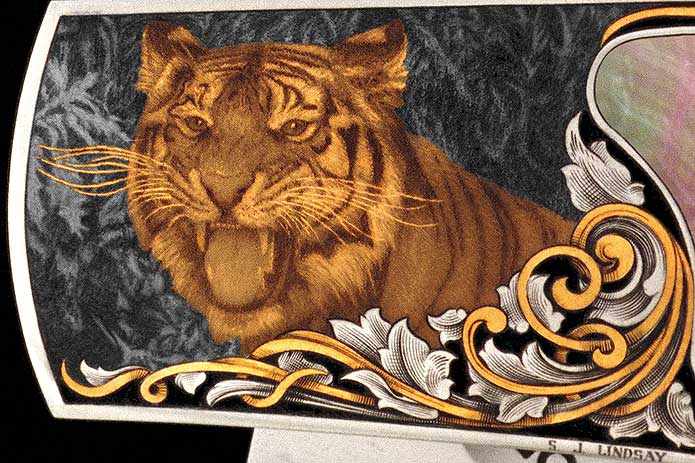
The tiger
whiskers in the tiger are .006" 24k wire. The larger chunk of gold is sheet. The
edges of the pocket were undercut with a wider, homemade-sharpened burr.
I placed hooks in the center of the large inlay to prevent it from
bowing up in the middle. Hooks can be made with a V or a flat graver without a heel. The absence of a heel allows the graver to dig in quickly, raising
a strong hook. Be careful not to allow the hooks to be higher than the original surface, since there is a possibility that when the gold is sanded down flush
to the surface, the hooks could show through as white spots in the gold.
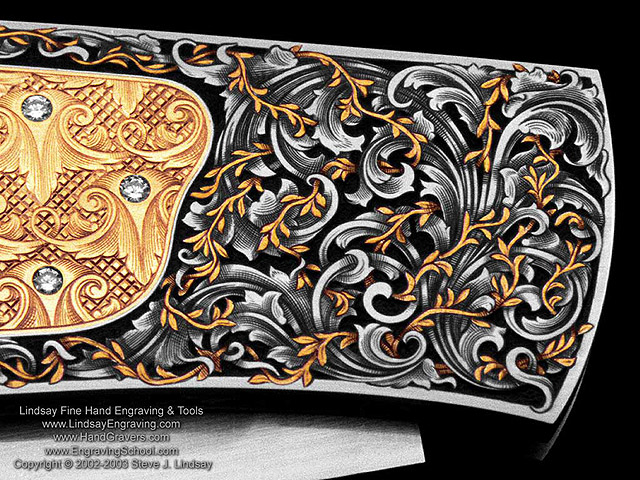
The
leaves in the above inlays are .010" dia. wire and the vines are .006" dia.
wire.
This piece was
also undercut with the rotary.

.png)